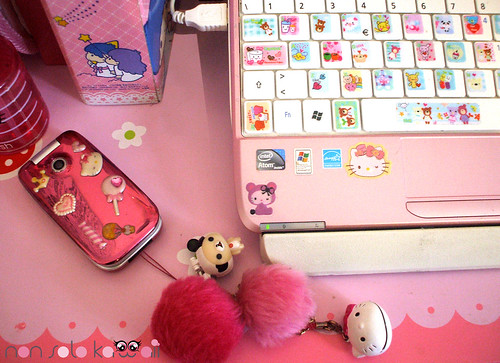
Do you have a boring cheap phone that you just don't like that much? Do you wish your dull grey phone would match your colorful personality? Do you like everything in your life to be cute, but think you just don't have the money or skill to do anything yourself to MAKE the things around you cute and pretty? Well then, stay tuned to find out how my phone went from cheap and boring to a pink sparkly gem among my possessions! I am don't have a lot of money or skill, but did have a lot of success!
Here again for another glorious Friday! Today I will be writing a mini tutorial on how I turned my simple cheap grey cellphone into a cute pink cellphone that I just love!
This method isn't for everyone and may not be good for your own cellphone. I would recommend something else for the newer cellphones that are expensive with a huge touch screen. This is more for older phones, usually flip phones, with a lot of area for color! Let's get started!~
(Pictured is the Samsung Gusto 1) This is what my cellphone looked like before~ (This is the picture from the internet since I didn't take a picture before I started since I got the idea to make a tutorial after I was finished, but it is this model.) Look at the cute kitty~ ovo
~Step 1~ Read the instructions of the tutorial before you begin so you know what your getting into. If you need to, ask permission from your parents first. (I am not responsible for you ignoring that instruction XD) After you do that and you are sure you can and want to do this let's begin!
~Step 2~ Make a plan and find a nail polish!
I suggest picking a nail polish color that would match your wardrobe, I used a pink because most things that I own are pink, that is my favorite color!~ If you are a person who likes nail polish, it will be a lot easier to find a color, though if you really wanted to you could stop by the store, a garage sale, or a friends house and buy or borrow some nail polish(Which would usually be rather cheap) I recommend picking a nail polish that does well on your nails before you go putting it on your phone! A good quality nail polish will make it easier, but I wouldn't stress terribly about it. Also, make sure the color is one that will look good on the phone! I would suggest not using too many colors or getting TOO crazy, sometimes being simpler can really help the final product. Get a piece of paper and draw your cellphone, find crayons or colored pencils, or even markers that are close to the nail polish colors you want to use and color it in! Once your satisfied with the design you can move on to the next step.
~Step 3~ Now that you have your phone, your nail polish, and your plan it's time to start painting! Make sure you only paint in one direction and are VERY careful around areas you do not want to paint. I would have cue tips and nail polish remover handy just in case. Also, you can use tape and tape off areas that have screen showing. When I did my phone I cut off tape to place over the front screen, but I found you must be VERY careful or when you take it off it could tear holes in your paint job. I think it may be best to cut the tape smaller than the screen so there are still gaps between the tape and the paint job so that most of your screen is protected, but you won't ruin the paint job. Still, be VERY careful around the screens. This is the most difficult part. Apply an even coat and at this point you may be panicking because it looks like a complete mess! Do not panic little ones <3~ This project requires a lot of time and many many coats of nail polish. I spent at least 2 or 3 hours with my phone open painting it. Let each coat dry and apply a new one evenly until it looks good! At the end I had about 6 color layers. I painted my phone in the open position and painted right onto the dark grey surface and none of the color still shows through. Just make sure you have a good amount of nail polish, but when I did it I had already used a good amount of the tiny bottle of nail polish to do my previous phone that looked almost exactly the same, but was stolen! (It was very sad, but I think it says something about the paint job! Who would steal a 10 dollar minutes phone if it were plain? BUT a pretty one I guess is worth stealing to some people :') ) I had barely any left in the bottle when I started the project this time and though it didn't look as good, it was still very effective. Now that you have your phone painted and you are pleased with the result, lets move on! (Let it dry overnight at some point before you add things)
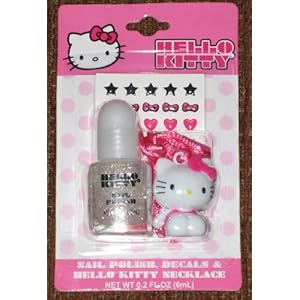
~Step 4~ At this point you should have a dry phone painted the color of your choosing looking FABULOUS! If you had some slightly uneven coats you may see bumps or imperfections in the coat when you look closely. Do not fear! This next step will make these things unnoticeable! I strongly recommend selecting a clear nail polish with sparkles in it and applying it generously all over the phone's coat of nail polish.
Something like this would be good, actually if you could find a nail deco kit that could come in handy too!
Let the coat of sparkle dry and you'll see that it really helped the overall look! Once you are finished with that and everything is completely dry, I suggest a top coat! Something that will really seal in the color.
Pictures of my phone took on my less than amazing camera at this stage in the process~ See how the sparkles really help even things out?
~Step 5~ (This is the most optional step and if you are already completely happy with the product, skip it) Time to decorate!! If you are the kind to collect stickers or things like that, they would be great to add at this point! Think again about where you would like things before you place them. Again, make sure the phone is COMPLETELY dry! Place down stickers and bits and bobs and decide where you would like to put things! You could glue just about anything on with some craft glue, just place it on and see where everything looks good before you glue it. My phone isn't finished with this step, but when it is I will add some pictures of that stage in the process! Instead, please settle for some creatively customized phones for a bit of inspiration.
And then your done!! You have a phone that is almost as cute as you are! I would love to see pictures of your phones when your finished, please send me some <3
~!TIPS AND WARNINGS!~
* You must be aware of any camera, screen, and flap thing (Like those things that go over your charger slot to protect it and stuff) Be VERY careful in those areas, it can make side buttons harder to push if you don't take a toothpick and slide it along the sides of the buttons where there is now nail polish right away! Just be careful and aware of those things and look over your cellphone well.
* I'd imagine you could use acrylic paint if you are an artist and had more of that than nail polish and I'd think it would work pretty much the same way, but I don't know a lot about acrylic paint so you may want to do some light research.
* It can be slightly messy so make sure you paint somewhere you will not make a huge mess. Make sure you do it over a styrofoam plate or something (that's what I used) and have some paper towels handy. Don't paint in clothes you love love love and would be sad to get messy just in case.
* I didn't paint the inside of my flip phone and I would NOT suggest it! It seems like a disaster to paint anywhere with all those necessary buttons, plus you need to be able to read them.
* You could use this method on things that aren't a phone too. I just used my phone as an example. It could work on small things like an MP3 player and stuff like that. I wouldn't suggest trying to paint something like your laptop with fingernail polish! (>v<)
* If you were concerned about ruining your phone, I would suggest buying some kind of plain cellphone covering and doing it on that and it works just the same and you could have different "clothes" for your phone to wear with your different outfits if you wanted to make more than one.
(My phone has been done this way a long time and hasn't faded or chipped at all, I don't think that is going to be an issue and will update this post as soon as I have any problems with my phone. So far it is as pink as the day I painted it! )
That is about it for today! I hope you all have a lot of fun with this and will show me the results~
Also! I was thinking I might start updating twice a week. Tuesday or Wednesday with something more personal like poetry, short stories, or some of my thoughts and things and then again on Friday with tutorials and reviews like I have been providing. Tell me what you think and vote in the comments what day I should so my other posting and what you would like to see in it. (Also, go ahead and tell me what you would like to see next Friday, open suggestions!)
Thank you for reading~!!! I was very pleased with my phone after this and I hope you will be too. Also, happy Friday the 13th!~ >V<
Sweetly Yours,
Skiteanna La~Sweet


No comments:
Post a Comment